Wednesday 27 April 2011

Do Until Loops

Just like a Do While loop, a Do Until loop repeats a sequence of code until a certain condition is met. The syntax for this type of loop is the following:

Do Until condition
    'Code to be executed
Loop

Again like a Do While loop, Excel can check the condition either before entering the loop (as above) or after Excel has run through the code once, as shown below:

Do
    'Code to be executed
Loop Until condition

You can use the Exit Do statement to force Excel to exit the loop when desired (instead of waiting for the specified loop condition to be met).

We can use the previous tutorial (the spreadsheet with the list of students and grades) as an example. The previous loop we used (Do While Range("C" & i).Value <> "") can be replaced with a Do Until loop instead:

Do Until Range("C" & i).Value = ""

Your code should now look like this:


Note that the not equal sign (<>) must now be changed to an equals (=) sign. Clicking on the "Generate grade" button has the same effect as before, assigning the appropriate letter grade for each student based on their percentage score.

Wednesday 13 April 2011

Do While Loops

A loop is used to repeatedly run through lines of code until or while a certain condition is met, usually for as long as a variable is equal to a specific value. Loops in VBA can take a number of different forms; this post will deal with Do While loops. The syntax for a Do While loop is the following:

Do While variable = value
    'Code to loop through
Loop

An example of this could be:

Do While strStudentName = "Dan"
    'Code to be looped through
Loop

Note that the = sign above can also be replaced with another condition, such as greater than (>), less than (<) or not equal to (<>). In the above cases, Excel will check the condition (variable = value) before entering the loop; it is also possible to have Excel check the condition after entering the loop, by typing the condition at the end:

Do
    'Code to be looped through
Loop While variable = value

Another useful tip can be to exit a Do While loop in the middle of the loop. This is done using Exit Do. Used with an If statement, you can have VBA exit the loop when a different variable (not used after the Do or While statement) becomes equal (or not equal) to a value.


Do While Tutorial

To practice using a Do While loop, open up the workbook we created in the last tutorial. Delete the letter grades in the "Grade" column and add a few more names and grades (percent values). Your worksheet should look something like this:

Now edit the "Generate grade" button code (note: a quick shortcut for accessing VBA code in a workbook is to press Alt+F11).

We're going to add a loop to go through the students one at a time, adding the letter grade corresponding to their percentage grade. In order to do so, we need to create a variable that increments by 1 each time we go through the loop and that corresponds to the row the student is entered in. We'll call this variable i, and it is an integer type. Declare it by adding it to the first line existing in the code; it should now read Dim intGrade, i As Integer.

We can then delete the last two "blocks" of code (where we referred to cells C4 and C5). Then, in the remaining block of code (which should refer to row 3, i.e. cells C3 and D3), replace any instances of 3 with i. For example, the line that used to read intGrade = Range("C3").Value should now read intGrade = Range("C" & i).Value. The If statement should also now use this format (i.e. wherever "D3" was entered before, replace it with "D" & i). Now create the initial value for i - Dan is the first student, in row 3, so at the very beginning (right after declaring the variables), we need to set i equal to 3, using the line i = 3. Finally, add in the Do While loop and a line to increment the value of i with each loop. This should look like this:

Do While Range("C" & i).Value <> ""
    intGrade = Range("C" & i).Value
    'If statement
    i = i + 1
Loop

This means that the code will loop through the If statement for as long as there is a student grade entered in column C, row i. You're finished code should look like this:


When you run your code, you should now get a letter grade for all of the students in the list - regardless of the number of students you have in the list! Previously our code would only work for 3 students, but now you can add 10, 20, 30 or 473 students and the macro will determine the letter grade for all students.

Saturday 9 April 2011

If Statements

A commonly used command in VBA is the If statement. It's used to check that a certain condition is met prior to executing your code. It can be a single condition, or you can have more complex If statements with multiple conditions and different code for each condition.

The syntax of an If statement is:

If Condition Then
    'Code to be executed
End If

The condition usually checks that a variable has a certain value. For example, you might have a worksheet in your workbook that you only want people with a password to be able to access. In this case you would probably have a user input (where the user would type the password, let's call the variable strInput) and then you could compare their input to the correct password. The If statement would look something like this:

If strInput = strCorrectPassword Then
    'Display protected worksheet
End If

Taking this idea further, you could also have a message appear if the user enters the wrong password. This would use an ElseIf command:

If strInput = strCorrectPassword Then
    'Display protected worksheet
ElseIf strInput <> strCorrectPassword Then
    Msgbox "The password you have entered is incorrect.", vbExclamation, "Incorrect Password"
End If

As you can see, by using the If... Then and ElseIf... Then statements you can create reasonably complex If statements for a large number of conditions. In addition to these two you can use the "Else" statement, which executes when none of the conditions in the If statement are met.

To learn about If statements we're going to write a macro that determines a letter grade for a group of students based on their numerical (%) grade. Open a new workbook and enter the following data into Sheet1, starting with the "Student" column in cell B2:

Student Grade (%) Grade
Dan 93
James 72
Laura 37


Then add a command button to the sheet and label it as "Generate grade". Your workbook should look like this:

Click on the button and then View Code. First we need to declare a variable to store the grade. An integer type will be fine for this:

Dim intGrade As Integer

We then need to read the first grade in from the worksheet and use an If statement to determine what range the grade falls in, in order to assign an A, B, C, etc. to the student. This should look like this:

intGrade = Range("C3").Value
If intGrade > 90 Then
    Range("D3").Value = "A"
ElseIf intGrade > 80 And intGrade < 90 Then

    Range("D3").Value = "B"
ElseIf intGrade > 70 And intGrade < 80 Then

    Range("D3").Value = "C"
ElseIf intGrade > 60 And intGrade < 70 Then
    Range("D3").Value = "D"
Else

    Range("D3").Value = "F"
End If

As you can see, this example demonstrates the use of If... Then, ElseIf... Then, and Else... It also shows how you can use 2 conditions for If or ElseIf statements (e.g. intGrade must be greater than 70 but less than 80).

The If statement above will only determine the letter grade for the first student, Dan. We now need to copy and paste the code above twice in order to determine the letter grade for the remaining 2 students. When you do this make sure you change the cell reference each time (so the first If statement block should read the grade from cell C3 and then output an A, B, C, etc. to cell D3; the 2nd should use cells C4 and D4, and the 3rd should use cells C5 and D5). This would be quicker and more efficient with a Loop, but we'll learn about those next time.

Your finished code should look something like this (some of the lines aren't visible in this screenshot, but it should give you the idea):

Now when you go back to the worksheet and click on the button, the macro should automatically give display an A for Dan, a C for James and an F for Laura.

Once you have finished this tutorial, save the workbook somewhere as we'll use it in the next tutorial to learn about Do While loops.

Friday 8 April 2011

Variables - Types and Declaration

A variable is used almost every time you output a value or take input from a user. A variable is simply a (temporary) means of storing a value which is used within the macro. There are several different types of variable, used for storing different types or sizes of values:

Byte
Holds positive values from 0 to 255. Requires only a single byte of memory, so is very efficient.

Boolean
Only 2 possible values: True (-1) and False (0). Requires 2 bytes.

Currency
Stores numbers from -922,337,203,685,477.5808 to 922,337,203,685,477.5807 as fixed-point data.

Date
Stores dates and times as real numbers using 8 bytes of memory. The number to the left of the decimal point is the date and the value to the right of the decimal point is the time.

Double
A floating-point data type, ranging from -3.402823E38 to -1.401298E-45 for negative values and from 1.401298E45 to 3.402823E38 for positive values.

Integer
Holds positive and negative integer values from -32,768 to 32,767. In the past there was a performance advantage to using integers instead of long variables (integers take up less memory), however in recent versions of Excel integer variables are converted to long variables, meaning that any performance advantage no longer exists. Requires 4 bytes (formerly 2 bytes).

Long
Holds positive and negative numbers from -2,147,483,648 to 2,147,483,647, using 4 bytes of memory.

Object
A data type that stores the address of an object in Excel.

Single
A floating-point data type, ranging from -3.402823E38 to -1.401298E-45 for negative values, and 1.401298E-45 to 3.402823E38 for positive values. Requires 2 bytes of memory.

String
A variable that stores text rather than numbers, from 0 to 65,535 characters. Can take any letter, number, spaces, punctuation or symbols.

Variant
The largest memory-wise of the variables at 16 bytes, a variant data type can store any kind of data (strings, numerical values, dates, etc.) If a variable is not explicity declared as one of the other variable types, Excel automatically assigns the variant data type to a variable.


Variable Declaration and Scope

When writing a macro you usually know what data each variable will be storing, so you can declare each variable as an appropriate data type. A variable is usually declared locally - within a procedure. When that procedure ends, the variable is erased from the computer's memory. Declaring a variable in this way is done for example as shown below:

Sub Macro() Dim intVariable As Integer End Sub
A variable can also be declared at the beginning of a module (which can contain more than one procedure). In this case, the data stored in the variable is valid for and can be used in all of the procedures within that module:

Dim intVariable As Integer Sub Macro() 'Code End Sub

Finally, a variable can be declared at the top of a public module. These variables are then valid for all procedures within all modules:

Public intVariable As Integer

It is also possible to declare more than one variable of the same type at the same time. This would be done like this:

Dim intHeight, intWeight As Single

I generally choose variable names that indicate the variable type; this makes it easier further down in the code to quickly identify what type of variable you're using for certain data. Note also that variable names must be continuous characters with no symbols or spaces, and cannot start with numbers.

So are you ready to write your first program with variables and user input?


Example Macro
The goal of this macro is to build on the first "Hello, World!" macro in my previous post by taking input from the user and displaying a message saying how old the user is.

Open a new workbook and set up a couple of cells as shown below (note that you must use the same cells - B2 and C2 - or edit the code below to read the correct cell for the user input). Then add a button and edit the caption of the button to read "Calculate age" (clicking cancel when the "Assign macro" window pops up after creating the button).

Select the button, then click on the View Code button in the toolbar. Declare two variables; the user's birthday (a date type variable) and the user's age (an integer type variable):
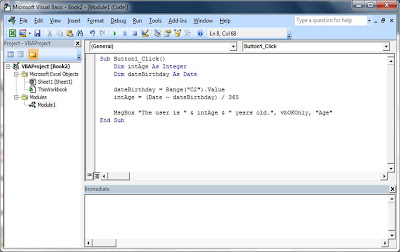
Sub Button1_Click()
    Dim intAge As Integer
    Dim dateBirthday As Date
End Sub

Now we need to read the user's birthday into the dateBirthday variable and then calculate the user's age from their birthday. Add the following lines to do so:

dateBirthday = Range("C2").Value
intAge = Application.WorksheetFunction.RoundDown((Date - dateBirthday) / 365, -0.1)

The calculation of intAge uses VBA's ability to call functions from Excel itself. In this case we need to round down - for example if the user is turning 38 in 2 months, using an integer variable for his age will result in it being rounded up to 38 - when he's actually still 37! Using the RoundDown function makes sure the calculated age is correct. And finally we display a message giving the user's age by adding this line:

Msgbox "The user is " & intAge & " years old.", vbOkOnly, "Age"

Your completed macro code should look like this:
You can now close the code editor window; enter your birthday into cell C2 and click the "Calculate age" button and, if your code is correct, you Excel should give you your age!

Thursday 7 April 2011

Setup and Hello World!

This post will run through a few quick points on setup, and then get you programming!

Start by opening up Excel. Depending on the version you have, you need to enable the Developer tools. I use Excel 2007, so the following instructions are for the 2007 version only. Click the Office button in the to left corner of the window and select "Excel Options". The "Popular" tab will automaticallybe highlighted. The third checkbox down from the top, labelled "Show Developer tab in the ribbon", should be checked (see screenshot below) - if it isn't make sure it is and then click OK.


Now you should have the "Developer" tab visible next to the other tabs (e.g. "Home", "Insert", etc.) Click on the Developer tab. In later tutorials I'll go through these controls in more detail, but for now we'll just take a quick look. The two sections of this tabe that will interest us the most are the "Code" and "Controls" sections. The controls allow us to add various, err, controls, to the workbook with which the user can interact. The Properties and View Code buttons allow us to modify those controls to look and behave the way we want.

The "Code" section contains a few different ways of viewing and editing the code in the macros. It also contains a button labelled "Macro Security", which we're going to click now. This brings up a box displaying macro settings. By default macros will be disabled and so you will not be able to run any. Select either "Disable all macros with notification" or "Enable all macros". The former option will ask for permission to run macros whenever you try to do so, whereas the latter will allow all macros to run. While enabling all macros could potentially be dangerous, if you aren't running macros from other sources there's no danger. Click OK.

We're now ready to start making our first macro!

Hello, World!

This macro will display a message box and a message when the user clicks a button.

The first step is to create the button. Under the "Developer" tab, click on "Insert" and choose a Button (the top left control, represented by a grey rectangle). Your mouse will change to crosshairs which you use to draw and position the new button. Click and hold anywhere in your worksheet and drag the mouse to create a button of the desired size. When you release the mouse button, a new window will show up, asking you to assign a macro to the button. For now just click Cancel.


The default caption of the button is "Button 1" - to change this, right click on the button and select "Edit Text". Delete the name and replace it with "Hello, World!", then click outside of the button. If you right click on the button again and select Format Control, further display options allow you to customize the button to look the way you want. Play around with them if you want to, then proceed to the next step.

Click on the button again (this time left click to just select the button without entering the Edit Text mode), then click on "View Code" in the Controls section of the Developer tab. This creates a new module (Module 1) and sub routine, Button1_Click(). In later tutorials I will explain more about sub routines and the VBA editing screen, but for now lets go ahead and code.

Between the two automatically generated lines "Sub Button1_Click()" and "End Sub", type the following code:

MsgBox "Hello, World!", vbOKOnly, "Hello, World!"

Your VBA editor window should now look like this:


Close the VBA editor window, save the worksheet somewhere, and then click on the "Hello, World!" button. If everything behaves as it's supposed to, you should now be looking at a message box saying "Hello, World!" - congratulations, you've programmed your first Excel macro!